Lattuce tutorial · Writer
Compose a draft in Writer
Draft an academic paper in Writer with source context, outline support, focused writing, and evidence-aware assistance.
Compose is for turning an outline and selected evidence into editable prose. Treat generated text as a draft: keep the section goal visible, inspect citations, and revise the wording before it becomes part of the manuscript.
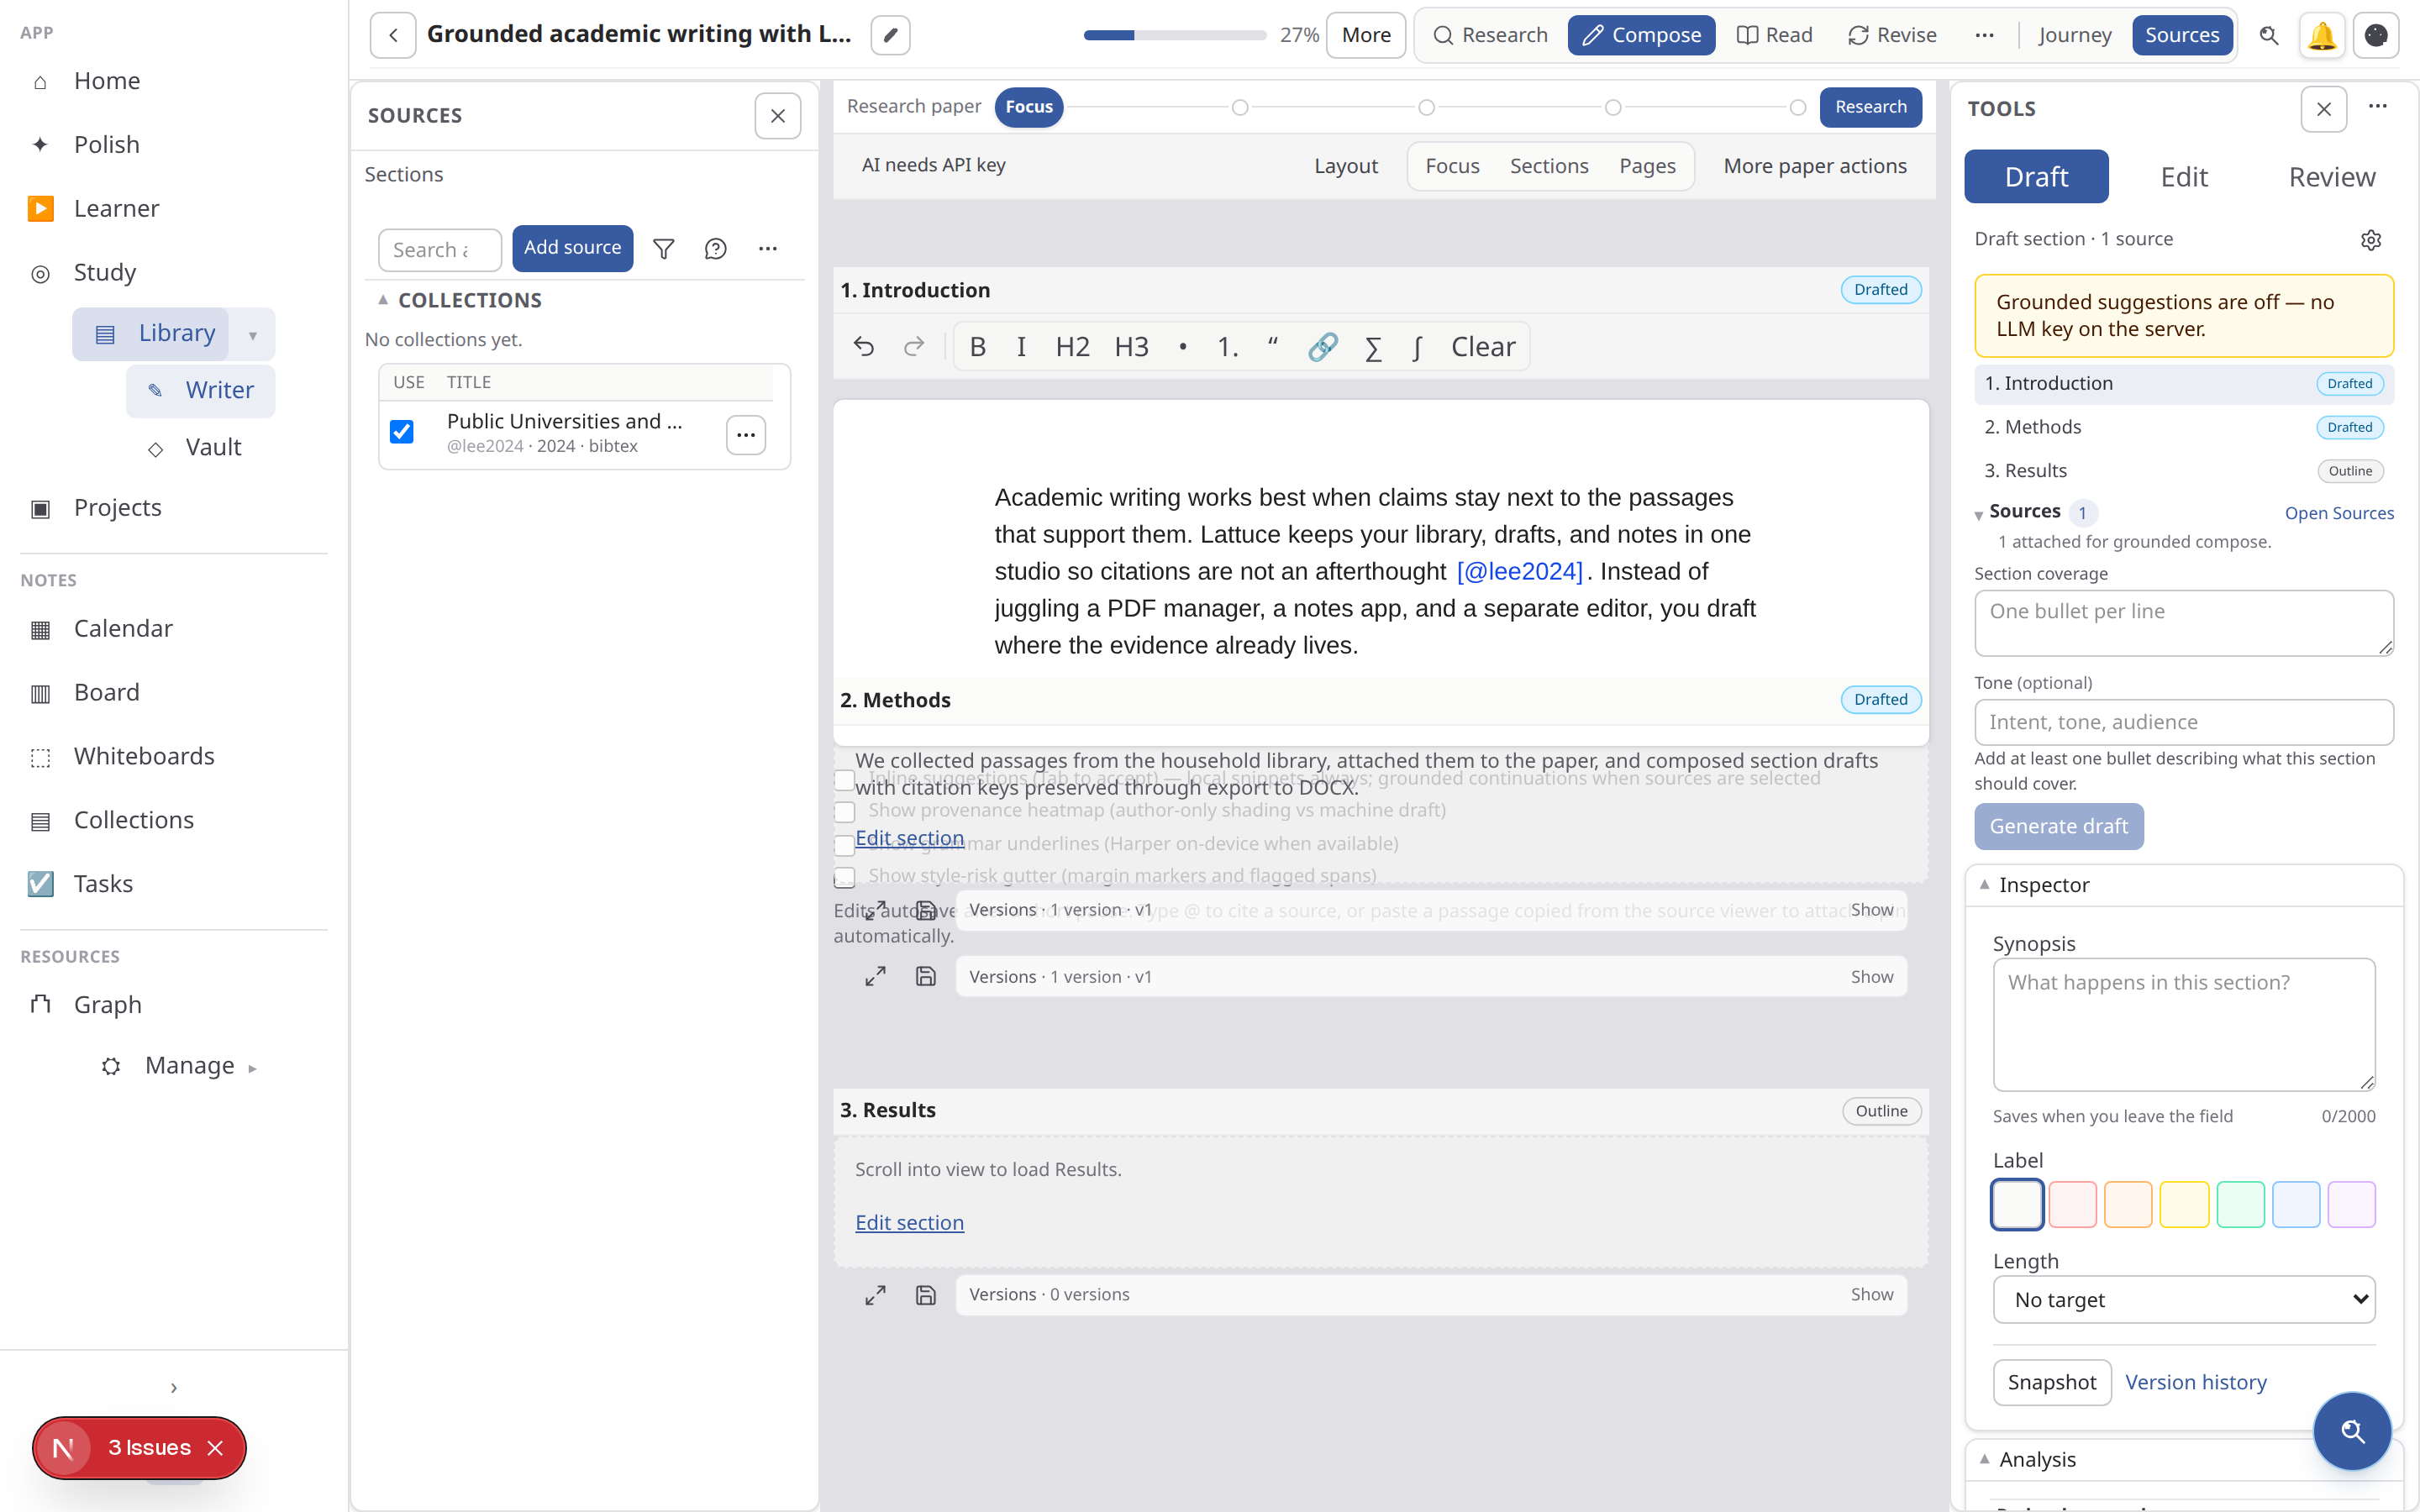
Three-pane Write workspace
- Open a manuscript from Library → Manuscripts or
/papers. - Switch to Write mode (header or Ctrl/Cmd+1).
- Left: sources. Center: section editor. Right: Assistant (compose, review).
Compose workflow
- Upload or attach sources (left pane).
- Add paper sections in the outline (one major part per section).
- In the Assistant right pane, open Compose.
- Select a section, add bullet points, then Generate draft.
Write a useful compose brief
Give the section a specific job, audience, and evidence boundary. Bullets such as “define the sample”, “compare the two findings”, and “end with the limitation” produce a more reviewable draft than a prompt to “write a section”. Name a source or citation key when one passage should anchor a claim.
After generation, read the first and last sentence, then verify every factual claim against the source preview. Accept only the text you want in the section; a generated suggestion is not a citation audit.
Focused write
Focused write is a dedicated canvas shell: the editor fills the workspace and Sources and Assistant open only as flyouts (not persistent studio columns). Low-chrome AI stays in the editor.
Enter and exit
- Library → Start writing or
/papers/writefor a quick-start blank paper in focused write. - Library → Research studio or
/papers/write?studio=1for the full three-pane workspace. - Paper → Layout → Focused write from the full workspace.
- The show panels icon (or Esc) returns to the three-pane layout (Esc closes compose overlay, peek flyouts/sheets, and source preview first).
Beside panel (Source | Slides | Pages)
On a wide screen, open a read-only reference panel beside the editor without leaving focused write:
| Affordance | How |
|---|---|
| Beside | Toggle on the focused-write bar (desktop) or the ⋯ tools menu (mobile). Opens Source (first ready included source), Slides (talk deck preview), or Pages (letter-sheet live preview) when no sources are ready. |
| Source | Slides | Pages | Segmented tabs in the beside panel switch between source preview, talk-deck slides, and paginated live preview. |
| Pages (studio) | Tools column on wide layouts; Paper actions → Pages view on tablet/phone opens a bottom sheet. |
| Citation click | Opens the cited source in the center split (Source tab). |
| Command palette | Beside / Hide beside on wide layouts. |
| Shortcut | ⌘⇧P / Ctrl+Shift+P toggles the beside panel (when not typing in a field). |
| Page estimate | Status bar shows ~N pages beside the word count (~2,800 characters per page) when Typst compile is unavailable. After a successful Typst PDF compile, the same bar shows N pages (PDF) with an optional Preview PDF link. |
Compose overlay (wide): the compose dialog includes the same Source | Slides | Pages beside panel on the right so you can reference material while generating a draft.
Esc order: compose overlay → peek flyout → beside panel → exit focused write.
On narrow viewports, source preview uses the mobile Preview tab instead of a horizontal split. Pages preview opens from Paper actions → Pages view (studio) or ⋯ Tools → Pages preview (focused write) as a bottom sheet with the same letter-sheet layout as desktop. Use Assistant peek for Ask; the focused split is Write | Beside only (no nested Ask column).
In-flow LLM (no side panes)
| Affordance | How |
|---|---|
| Suggestions | Toggle on the focused-write bar or command palette. Tab accepts; Esc dismisses. |
| @ citations | Type @ in the canvas to pick a ready source key. |
| Selection toolbar | Select text → Fix, Shorten, Tighten, Formalize, Extend, Ideas, or Custom prompt. |
| Compose overlay | Compose button, command palette Generate draft from bullets, or ⌘⇧G (Ctrl+Shift+G). Uses the same compose pipeline as the Assistant pane, including draft settings (length, grounding, humanize, and locked terms) via the settings control in the overlay header. |
| Peek sources / Assistant | Sources or Assistant on the focused-write bar opens a flyout beside the canvas on tablet and desktop. On phones, the same actions open a bottom sheet (Notes-style) so the editor stays full width. Sources do not auto-open on first visit — open them when you need them. |
Outline-only compose
When no sources are attached yet, focused compose can still generate from section heading + bullet points. Output is labeled stylistic only until sources are ready.
Keyboard shortcuts (focused write)
- Esc — close compose overlay, peek flyout, or source preview; then exit focused write.
- ⌘⇧G / Ctrl+Shift+G — open compose overlay (when not typing in a field).
- ⌘⇧P / Ctrl+Shift+P — toggle beside panel (wide layout).
- ⌘⇧M / Ctrl+Shift+M — insert inline equation.
- Slash commands — type
/at the start of a line (or after a space) to open the Insert / AI menu. Filter as you type; ↑↓ Enter to pick; Esc dismisses and leaves the typed text. Exact aliases (/table,/math,/mermaid,/flowchart,/sequence,/image,/pagebreak,/page-break) still commit on Space or Enter without opening the menu.
Insert menu (focused write)
Use Insert on the canvas for tables, equations, Mermaid diagrams, images, and page breaks without opening the full formatting toolbar. Page breaks export to DOCX as hard breaks (visible in Word); they are not a paginated editor preview. The insert control sits in a slim row above the page body so it does not cover your first line of text.
Page margins
Focused write uses responsive side margins: tighter gutters on phones, gradually widening on tablet and desktop to preserve a ~1 inch reading feel on large screens.
Choosing the right layout
- Use the three-pane layout when you are comparing sources, sections, and assistant output.
- Use focused write when the main task is sustained drafting and the side panels would distract you.
- Use Beside → Pages to check pagination and Beside → Source to confirm evidence without leaving the editor.
- On a phone, use the Preview tab and bottom sheets; do not expect desktop columns to remain visible.
Export formats
Draft and final export support DOCX (default), LaTeX, Typst, and PDF from the export bar. LaTeX/Typst/PDF are best-effort: Mermaid blocks may stay as fenced code or images; citation pins may collapse to source-level references.
For talk slides, use the paper dashboard Slide decks hub: seed a talk deck from sections, present fullscreen, or export a Lattuce-branded slide PDF (registers as a tagged lecture source). See Help: Lecture slides in Writer.
LLM not configured
If the Writer API has no LLM keys, the focused-write bar shows a non-blocking notice. Local snippet completions still work; grounded suggestions need operator LLM setup.
Draft quality checklist
- The section has one clear claim or purpose.
- Sources are attached and extraction is ready before grounded generation.
- Citations sit next to the claims they support.
- Generated prose has been checked for meaning, tone, and unsupported additions.
- The section outline and paper metadata still match the intended deliverable.
For source preparation, see Sources in Writer. For selection-level changes, see Edit, proofread, and paraphrase.
Browse more in Writer or return to all tutorials.